

How Draw A Rose Step By Step


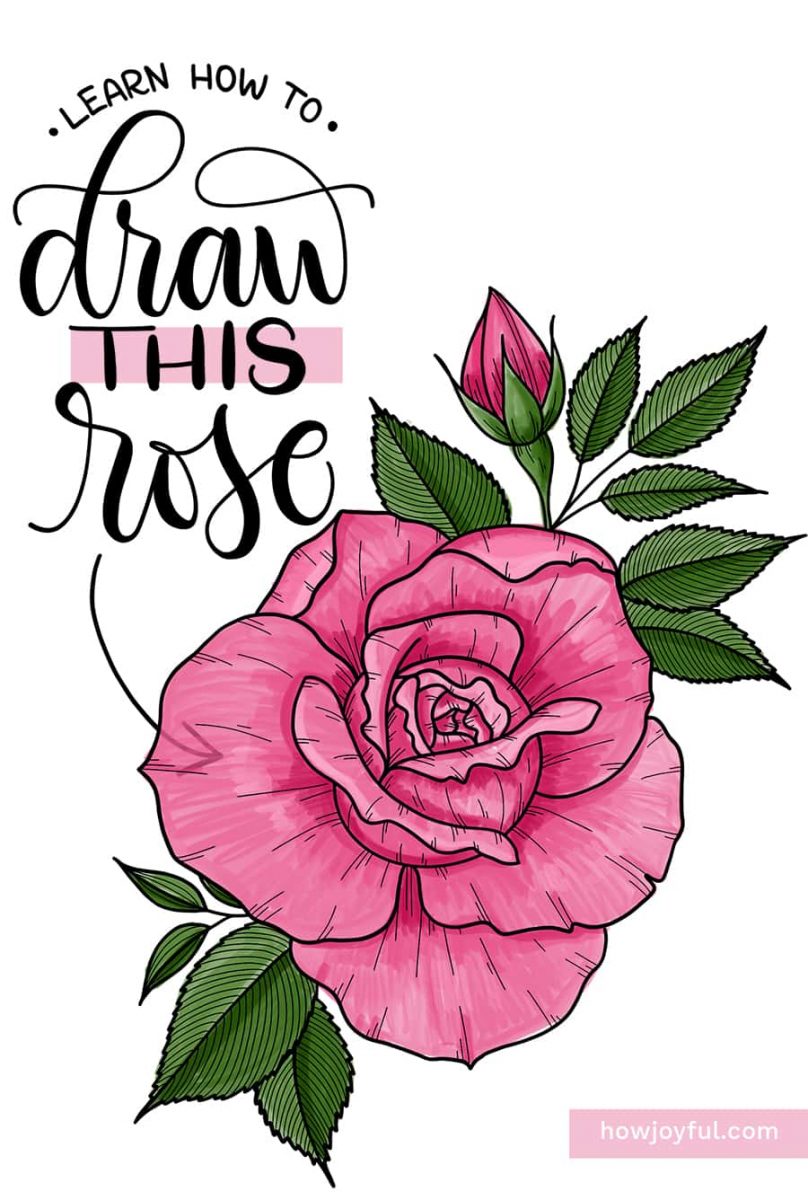

Check the 3 unlike drawings of roses and the easy step-by-step instructions on how to depict each one of the rose styles to spice up your lettering, calligraphy pieces, or bullet journal spreads.
In this beginner tutorial, we will go over how to create three dissimilar ways to describe a rose post-obit detailed steps on how to describe a rose.
No matter the tools y'all are using for drawing. If yous desire to sketch using pen and newspaper or digitally with an iPad and Procreate. This tutorial can help you go started with rose doodling.
I believe that getting started with drawing flowers doesn't have to exist intimidating, this is why I am sharing 3 unlike ways to describe a rose that will build your confidence as you movement from easiest to modern advanced. That manner we tin can build upwardly to more than advanced shapes.
This cartoon tutorial will help you feel more confident in your drawing skills and so that you can conquer more difficult or realistic ways to depict a rose in the time to come.
In this post, I will comprehend
- Anatomy of a rose
- Drawing supplies
- Sketching tools
- Inking tools
- How do y'all brand a simple rose ( 1ts way)
- Easy to draw Rose from the side (2nd way)
- Rose drawing from the top (3rd mode)
- Sketching roses – Practice makes better
Anatomy of a rose
In guild to draw roses, information technology is important to know a trivial about anatomy, merely similar we did in the leafage drawing tutorial post. Because there's no meliorate reference when nosotros draw something than the existent matter.
Most of my sketches of roses come from live references of from real pictures of flowers, so permit's check at the parts of a rose:
- Bloom head (corolla): The second of a serial of flower parts growing from the peduncle, composed of petals.
- Petals: 1 of the units of the corolla of the flower. Roses have from four to over 100 petals, depending on the variety.
- Sepal: These are the green coverings of a flower bud that opens to reveal the petals of the rose. Roses usually have 5 sepals.
- Peduncle: The principal stem of an individual flower or of a spray.
- Leaf: An organ arising laterally from superficial tissues of a shoot apex. It is usually flat and may be simple or chemical compound.
- Three leaflet leafage: The leaves are alternate and feather-formed (pinnately chemical compound), normally with oval leaflets that are sharply toothed.
- Thorn: They are technically prickles, outgrowths of the epidermis. A branch of a constitute that becomes woody, hard, and pointed.
- Stem: The base of operations of a flower, it's the main body or stalk of a rose.
Drawing supplies
Beginning, we do need to cover what you will need to offset sketching, because even though you lot can draw these doodles with whatsoever you take around, if you are ready to exam something else, here is the list of all the things I apply for drawing, sketching and inking.
If you are looking for sketching paper, this HP paper rem that I recommend to start using with Castor Calligraphy is too wonderful for doodles, you lot tin also use tracing paper to create "layers" and correct your drawings. I as well recommend this journal in case you don't have one, and this notebook in example you want to add watercolor details, or yous want to brand sure there's no bleeding on your pages since you can color and sketch on both sides of the pages, it's awesome, get it here!.
Beneath are some of my favorite tools, but every bit I e'er say, only start with what you take, even if that is a napkin and a pen. Get started drawing and sketching at present and purchase materials afterwards downward the road =]
If you lot want to work on your iPad instead, here you can see a list of my electric current digital drawing setup and recommendations. Also, here y'all can read all about the Procreate brushes I apply and recommend.
Sketching tools
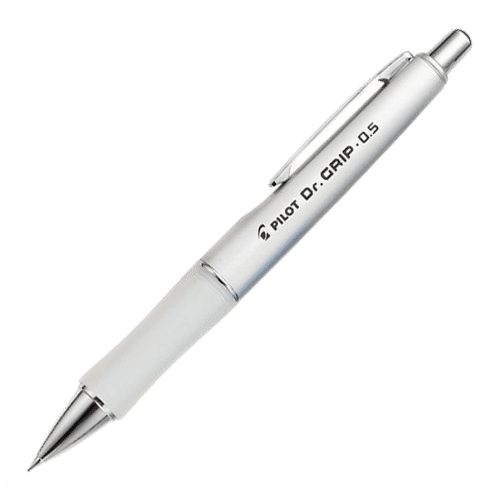
Airplane pilot Dr. Grip Mechanical Pencil
I dear how thick this mechanical pencil is (0.5mm), I e'er have it in my travel pencil instance (if my boys don't steal it). The grip is super comfy and irresolute the lead to a softer i will give you and then much control and shades.
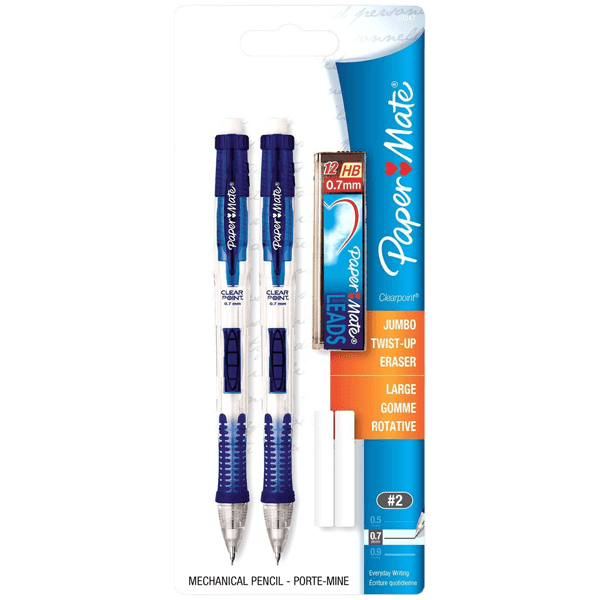
Paper Mate Mechanical Pencil Pack
I beloved having a bunch of these around for when I want to sketch something really quick, and the 0.vii mm size is my favorite ever! And while they come with HB leads, only like any other mechanical pencil, you can add a different softness of leads. I like to add strikers and I take them in dissimilar colors to differentiate the leads.

Pentel Triangle Eraser
This is my absolute favorite eraser, I first purchased this one while still in higher back in Chile, it was the older version but the same concept. I love that the shape of the eraser gives you three sharp points that you can employ to be more precise, it's mode better than the round ones in my opinion. Besides, it's a great alternative if you don't take an eraser shield.

Staedtler Eraser
In that location are some things that one time you find the brand that you love, you just stick to it and never look back. For me the Staedtler erasers are it. I've been using them since my early college years and absolutely dear them!

Amazon drawing pack
If you desire to experiment with the dissimilar softness of pencils, this pack offers 6 dissimilar softness of graphite pencils, iii charcoal pencils, one sketch stick, 4 charcoal sticks, 1 pencil sharpener, 1 charcoal sharpener, ane kneaded eraser, and 1 white plastic eraser.
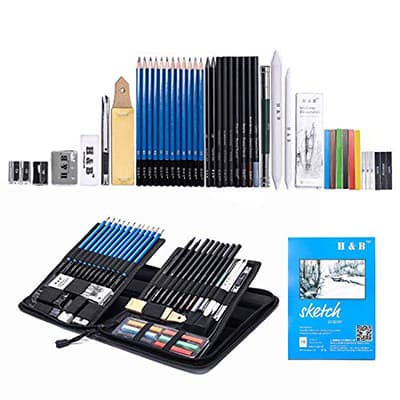
Sketching pack (48 pieces)
If you are looking for an even more consummate choice, that is likewise very budget-friendly, this pack offers pretty much everything yous would demand (newspaper included). Information technology even comes with a pouch then you tin can deport all your pencils and tools.
Inking tools

Faber-Castell Pitt Pen ready
This pack is awesome for lettering because you get a wide diversity of thickness and likewise one brush pen, so if y'all want to get-go lettering merely you lot are non sure if brush calligraphy is for you, y'all can just become this and start practicing with the one included here. They are a peachy deal likewise! (Instead of buying them in singles)

Staedtler Lumocolor Fine Point
I beloved that this pen tin can be refilled (the refill station is sold separately) but if yous are doing a lot of work, something like this comes super handy, I was using SO MANY pens, until I found this kind of refillable ink pen. They are not equally cheap at the beginning simply worth every penny in the long run.

COPIC Multiliner Pack
I was as well introduced to this multi-liners during technical cartoon in higher, but it took me a while to find them hither. I love that these particular ones have a bully range of thickness, they are refillable and you can too replace the bill. These features are awesome considering I tin can go through one pen in just a couple of days, so this characteristic really helps my wallet (and can save you lot a ton as well!)

Tombow Fudenosuke Castor Pen
This castor pen set is by far my favorite when it comes to learning, information technology comes in a soft and difficult version. Fifty-fifty though the divergence is not huge, you tin make a niggling chip thicker downstrokes with the soft tip. They handle pressure amazingly skillful and if you lot use them with the correct paper (read my paper recommendations ) they can last you a long time. They come in unlike colors that are bright and then pretty.

Pentel Fudenosuke Castor Pen
This one is my second favorite fude brush pen, you can also go it in a bunch of crawly colors, and that is always a plus! (you tin encounter them linked beneath) I love how durable they are and they have lasted me way longer than I thought they would.
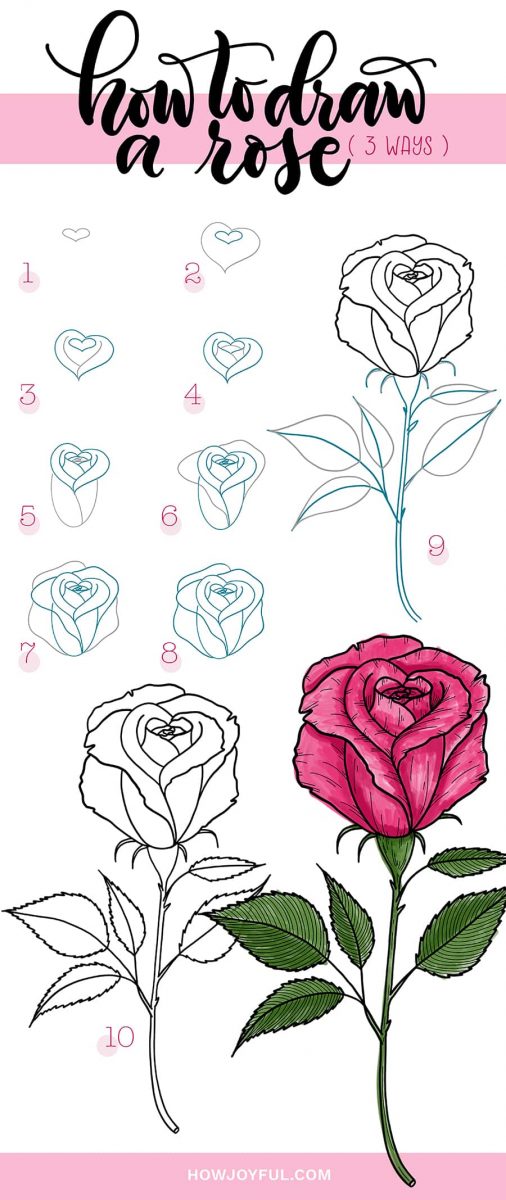
How practice you make a simple rose ( 1ts way)
The most simple manner to draw a rose is by doing a circle doodle move, so permit'south check out how to draw this flower footstep-by-step.
ane – First depict a minor circumvolve. This will exist the body of the rose. Jut equally with whatsoever putter, this doesn't take to be a perfect circle =] After that, you lot volition draw a line finding the middle points and rotating them to ane side.

2 – The process to create the inner petals is very simple, but in the commencement, it tin can be a little confusing. To aid with that I always like to think about how the following line e'er starts where the previous one ended.

iii – For each petal, we will start where the previous stroke concluded, and we will aim to hitting at around the middle of the opposite side, with a slightly curved line. Once more this doesn't have to be perfect. Imperfection actually adds to the charm of the rose petals.

4 – The lines will get smaller and closer together when nosotros are starting to accomplish the center of the rose, and then depending on the initial size of the circle nosotros used to start the rose. There can exist equally many or every bit few petals every bit we want.

five – I like to get as close as possible to the other lines when I am drawing the centre, this way it would expect a tad more like a rose since the center is always very tight with petals.

6 – To add together a little extra to the putter rose, I as well added a few leaves, for these I decided to practice two clumps on each side. I started by making lines where the vein of the leaf will be, and then drawing the sides.

vii – After my guides for the leaves were done, I inked on top and gave the signature toothed-edges that rose leaves accept. To requite it a little actress visual impact, I address thin lines to the leaves and added some details inside the rose petals. While this is non necessary, personally like how much depth this gives to the rose.

8 – To end it up, I added some colour to both the rose and the leaves. I used ii different green shades for the leaves, using them consistently on 1 side to give a light and darkness consequence. The same thing with the rose, I used shades of pink instead of the classic red rose. Added a lighter colour towards the upper edges and a darker colour towards the bottom of the leaf.

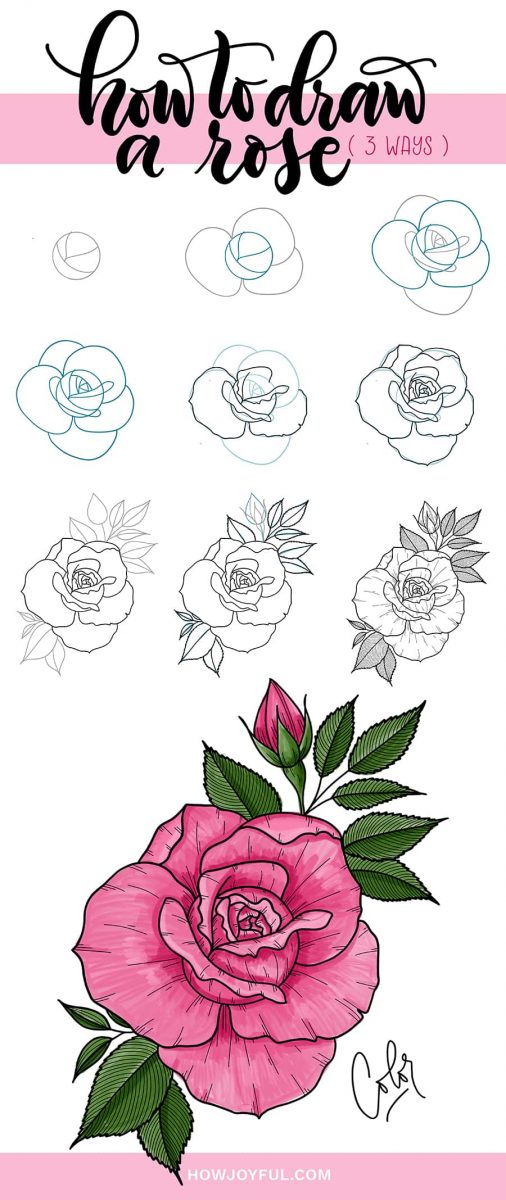
Easy to depict Rose from the side (2nd way)
This rose looks a fiddling more realistic than the first 1, but it's still easy enough for beginners, If you follow each pace I share for how to draw this cute rose, you should be able to go like results and with practice, your rose not only will look improve merely eventually, you lot will not need guides to draw them.
1 – Nosotros are going to start past cartoon a modest and wide heart shape. This will be the center of the bulb of the rose. After that, we will draw another center, just this time longer and less wide. We will likewise place the acme center of the heart off to the side, this way it will have a more organic wait to the eye instead of a perfectly symmetrical one.

ii – Now we will ascertain the center petals, starting from the center of the bigger heart. We volition follow the side edge of the eye. For the opposite side, we will offset a little in a higher place the center betoken and mirror the get-go stroke. After that, nosotros will describe lines from the small heart down as shown below and another beyond the eye in a bend motion.

three – Side by side we will depict an elongated ellipse and continue the line from the bottom of the bigger heart until information technology touches the bottom ellipse line. And just like on the first round rose, nosotros will make lines for the center of the rose. After that, we volition start with the outer petals, for the first one, we volition start at the lesser point of the oval and draw an uneven line, brand sure you go below the pinnacle of the bigger center to requite it a more fluid look.

4 – For the 2nd outer petal, we will draw uneven shapes on both sides and also on the top, the goal is to make an overall symmetrical blossom head. This shape will be the guide that we will apply to ink the rose, nosotros will use more organic lines, especially on the edges, to give it a more petal-like look.

five – I really like adding piffling intents to the elevation-center of the petals that are completely open, this makes a cute detail and makes it look a little more realistic fifty-fifty though we are using simple shapes. Afterward that, we can kickoff sketching the stem, sepals, and peduncle.
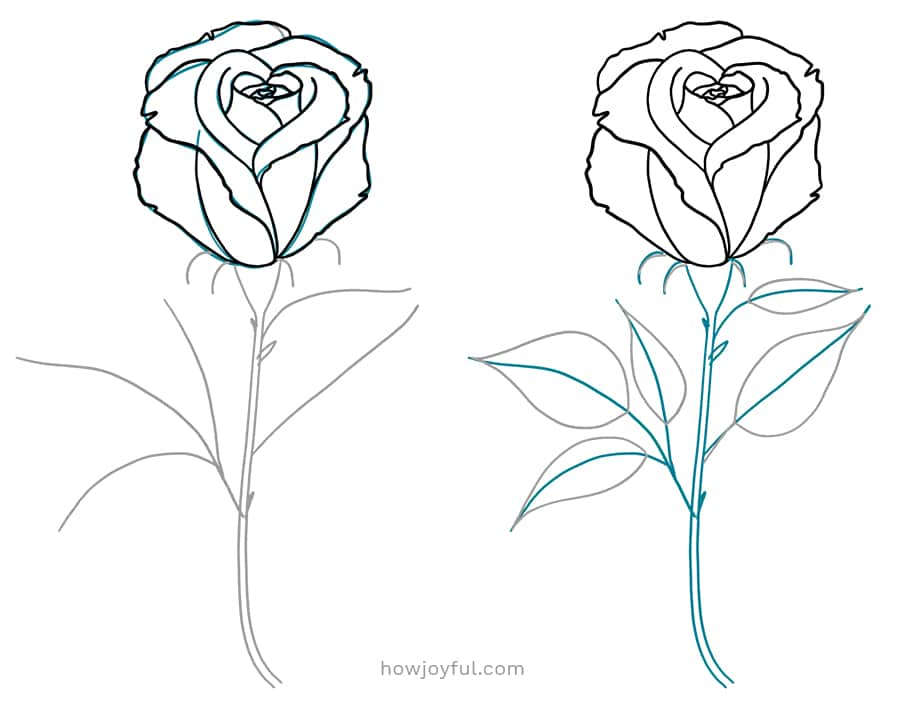
6 – As nosotros did before, utilize the guides to describe the leaves. I have a very detailed post well-nigh how to draw leaves right here. Ink the concluding rose or only utilize a softer pencil to brand the lines thicker and bolder. Erase or get rid of the guides before calculation the final details.
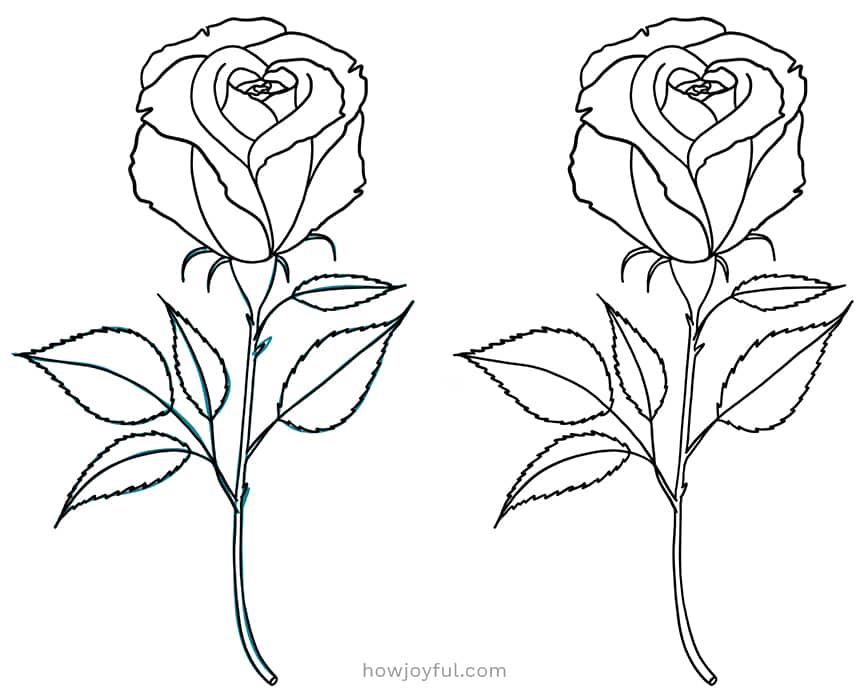
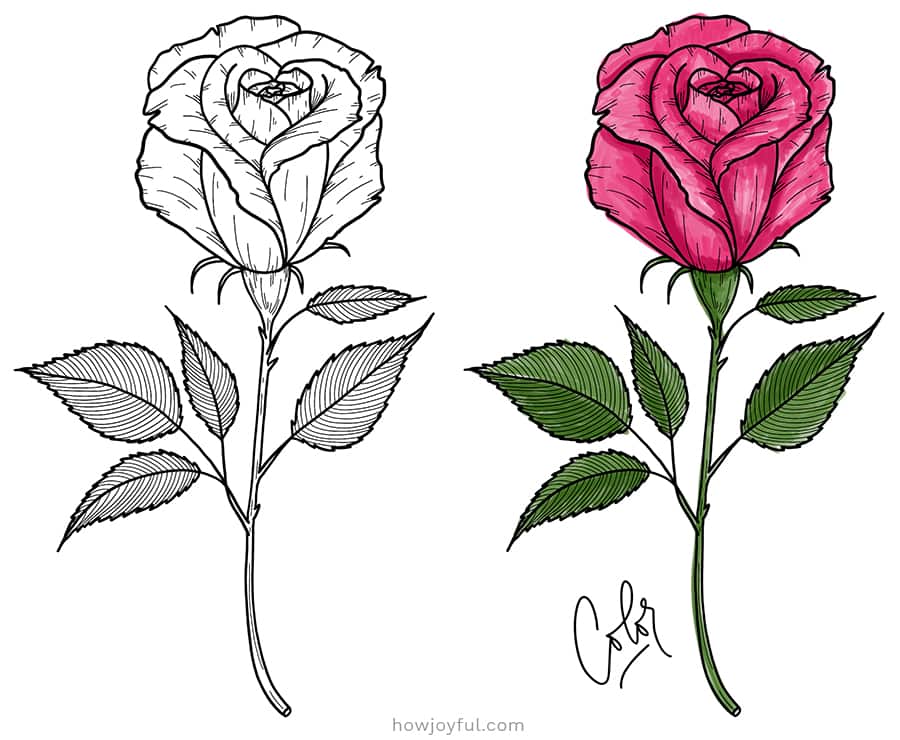
seven – Use thinner lines to create texture in the leaves and details in the rose by following the natural shape of the petals and what would be shaded in the rose. I really like how much impact some lines can accept in a elementary drawing like this. I finish the drawing by adding color, merely every bit earlier, I used a hot pinkish colour instead of the classic red rose. And for the leaves, I used two shades of greenish. Since I colour this digitally, I used the textured brushes from my Procreate pack to add more than dimension.
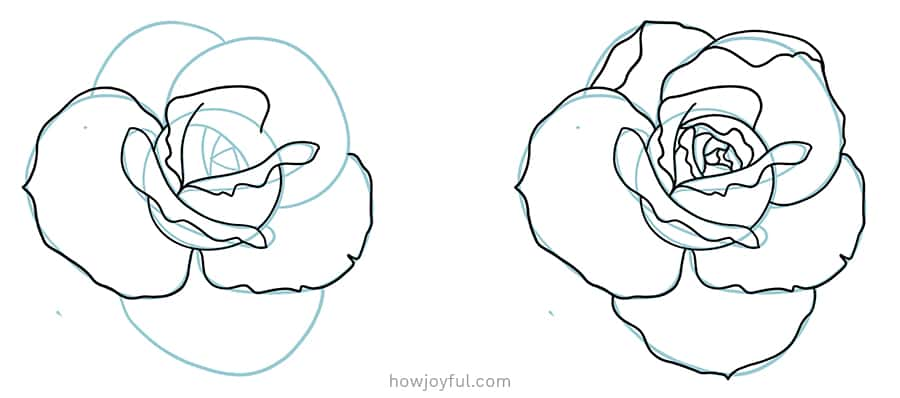
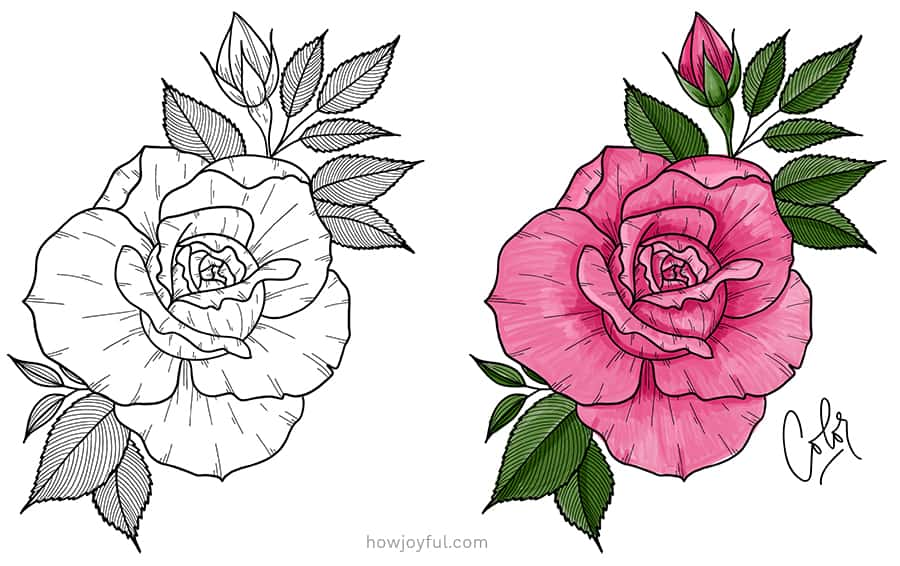
Rose drawing from the tiptop (3rd way)
Out of the three versions, this is the more realistic rose drawing. But it does not have much detail because we are not really going for a fully realistic look. This fourth dimension, nosotros are approaching a top view of the flower and I added a small rose seedling to brand the illustration drawing a lilliputian fuller.
1 – For the final rose, nosotros volition start with a circumvolve and draw a moon-like shape tilted towards one side. then from the eye draw a Five-like shape having i side bigger than the other. And so draw a petal on one side, continue with another on the upper edge, almost divided in three, but instead of drawing them next to each other, the last two volition intertwine.

2 – At present add the upper and lower petals to cease the outer shape. For the inside, add an outer-circular shape to the lower office of our moon and to one of the sides as shown below. This will be the guideline for the caput of the Rose. Use the technique we learned in the first rose to create the very middle portion.

3 – To make the rose as organic and realistic equally possible, utilize uneven lines on the edge while making the last lines, as nosotros did with the previous rose, brand little indents in the eye-elevation of the outer petals. Follow the case beneath to finish up the cartoon of the head of the flower.
4 – After inking the flower, describe leaves on both sides of the rose but every bit we did with the previous flowers. This fourth dimension we are as well calculation a bulb, for this we will kickoff with a foliage shape with a round bottom. Once the guidelines are prepare, ink the leaves and add tooth-shaped edges. For the bulb draw guides as shown below dividing the seedling in three to adapt for the sepals. Divide the meridian towards the side to show ii petals.

5 – As nosotros did before, using thin lines to create texture on the leaves and details on the head of the flower, cheque where the petals would naturally fold and add lines there. In my instance, I used my Procreate brushes to add together color to the rose. Using hot pink and smudging a lighter shade of pink where the light would bear on the petals and leaves.
Sketching roses – Practice makes ameliorate
Just like with anything new, you will demand to practice in social club to see progress, sketching roses is not super piece of cake, roses are complex flowers to draw (unless you are drawing the get-go style I shared here) the more realistic we get, the harder is to imagine how the petals volition curl.
If you want to experiment with different views, and further improve your rose-drawing skills I recommend y'all to expect at a existent rose for reference. Or you lot tin check pictures of real flowers for line drawing inspiration (I made this lath on Pinterest) I too created a specific section inside that lath for but Rose pictures.
If y'all want to salvage this post for later on, but pin the images below =]
I will add more tutorials for drawing presently, and so brand certain you come up back! And have a look at this mail service with 100+ easy things to draw ideas for your lettering pieces or bullet journal.
Happy drawing!

Source: https://www.howjoyful.com/drawings-of-roses/
Posted by: stainbrookmork1972.blogspot.com
0 Response to "How Draw A Rose Step By Step"
Post a Comment